
Implementing a Singly Linked List in TypeScript
A Step-by-Step Guide to Writing Your Own Singly Linked List with the Combined Power of ES6 Classes and TypeScript


PermalinkWhat is a Linked List?
The Linked List is probably one of the most popular data structures in computer programming, and the singly linked list is even more so. It has a linear structure and its elements are not stored in contiguous memory space — they are distributed randomly across available memory space.
They are used most times as a base for the implementation of more complex data structures like queues, stacks, graphs, etc. In the real world, linked lists can be used in GPS navigation systems to store a list of locations and routes, in operating systems to manage task scheduling and so many others.
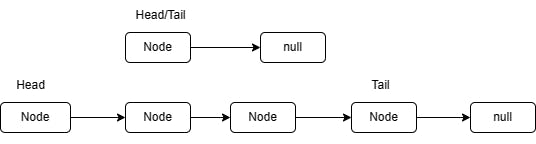
Each node in a singly linked list points to the next. The first node is called the head while the last node is called the tail, and points to a null reference. If there is only one node in the list, it points to null. To access any node in the list, we have to walk sequentially through these pointers, starting from the head. The picture below should help in visualizing what I've said so far.
PermalinkCode Implementation
PermalinkThe ListNode Class
The first thing is to create a ListNode class that will hold each node. A new instance of this class is going to be created every time we want to add something to the list.
class ListNode <T> {
    value: T;
    next: ListNode<T> | null;
    constructor (value: T) {
        this.value = value;
        this.next = null;
    }
}
When the ListNode class is instantiated, the value is required and is immediately set in the constructor, while the pointer, next is set to null. This pointer could change later based on whether or not more items are added to the list.
PermalinkThe LinkedList Class
Now that that's taken care of, the next thing to do is to define the LinkedList class. We specify the type for the head and tail nodes — which keep track of the first and last items on the list, as well as some instance methods — append, delete, which as the names imply append nodes to the end of the list and delete nodes from the list and printList which aims to print all the items in the list.
First, instantiate the list class by passing the first node into the constructor function and then setting the head and tail properties to this node. Implementing each method comes next.
class LinkedList<T> {
    head: ListNode<T>;
    tail: ListNode<T>;

    constructor (node: ListNode<T>) {
        this.head = node;
        this.tail = node;
    }

    append (node: ListNode<T>) {}

    printList () {}

    delete (node: ListNode<T>) {}
}
PermalinkAppending to the List
The append method is implemented by passing the node to append as an argument to the function and then declaring a current node variable to be the tail. So all we need to do is equate the pointer of the tail to the node to be appended and then finally change the tail property to now be equal to the node that was just added.
class LinkedList<T> {
    head: ListNode<T>;
    tail: ListNode<T>;

    constructor (node: ListNode<T>) {
        this.head = node;
        this.tail = node;
    }

    append (node: ListNode<T>) {
        let curr = this.tail;

        curr.next = node;
        this.tail = node;

    }

    printList () {}

    delete (node: ListNode<T>) {}
}
PermalinkThe printList method
The next method in line is the printList method, which is pretty straightforward. We start by initializing a current node variable and setting it to the head node. Once this is done, using a while loop we loop through each node while the node's next pointer isn't null, print this node to the console and set the current node to each node. Once we exit the loop, the current node will be on the last node because it points to null and this last node is printed. The method is shown below.
class LinkedList<T> {
    ...
    printList () {
        let curr = this.head;

        while(curr.next) {
            console.log(curr.value);
            curr = curr.next;
        }
        console.log(curr.value);
    }
}
PermalinkDeleting a Node
The last method, delete is a bit more complex to implement than the previous ones. I'll try my best to explain it in detail before showing you what the code looks like. So we pass in the node that is to be deleted as an argument and then starting from the head and using the while loop just as before, we walk through the list while constantly comparing the value of the next node with that of the one to be deleted. Take note of this, we're not comparing the value of the current node, we're comparing the value of the next node. This detail is important in the implementation of this method. Once we've gotten to the point (call it the previous node) where the next node's value satisfies the constraint, the loop is exited and then this is where the deletion logic is placed.
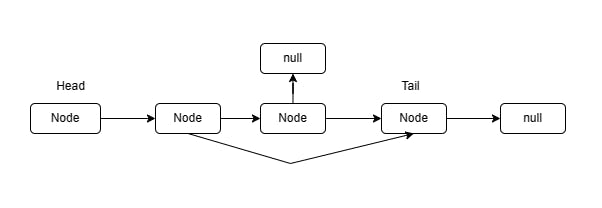
So what is going to happen is the pointers of both nodes (the previous node and the current node to be deleted) are going to change. First, the pointer of the previous node is set to the pointer of the node to be deleted, and then the pointer of the node to be deleted is set to null, effectively cutting it out from the list. So the next time you walk through the list and you get to the previous node, you skip the node that was deleted because the pointer has changed. The picture below might convey my thoughts better.
class LinkedList<T> {
    ...
    delete (node: ListNode<T>) {
        let prevNode = this.head;

        // If you're trying to delete the head node
        if (this.head.value === node.value && prevNode.next) {
            this.head = prevNode.next;
            prevNode.next = null;
        }

        while (prevNode.next && prevNode.next.value !== node.value) {
            prevNode = prevNode.next;
        }

        let currNode = prevNode.next;
        if (currNode) {
            prevNode.next = currNode.next;
            currNode.next = null;
        }
    }
}
PermalinkTesting
To test out your implementation of the linked list, you can use the code block below. It creates three different ListNodes, instantiates the LinkedList class with the first node and then prints the list to confirm that it prints the value of the first node, which is the string 'first'. Then call the append method and pass in the second and third nodes, after which you confirm it's been appended by calling the printList method again.
To test the delete method, pass in any node to the delete method and print the list again to confirm that the node is no longer there.
// create some list nodes
const first = new ListNode('first');
const second = new ListNode('second');
const third = new ListNode('third');

// instantiate the list class with the head node
const list = new LinkedList(first);

list.printList(); // 'first'
list.append(second);
list.append(third);
list.printList(); // 'first' 'second' 'third'
list.delete(second);
list.printList(); // 'first' 'third'
PermalinkSummary
This is a bare-bones implementation of a singly-linked list and you can extend its features to include properties & methods like the length of the list, inserting nodes before or after a specific node, and almost any other thing you can think of.
I hope this article has introduced you to how to implement your own singly linked list in typescript. Feel free to drop any questions or comments you have right here or you can message me on any social media listed below.
Thank you for your time and I hope to see you in the next article. 👌
PermalinkLet's Connect!
Don't be shy and say hello to me whenever you can. I'm always happy to meet new people.
Subscribe to our newsletter
Read articles from Mubaraq's Musings directly inside your inbox. Subscribe to the newsletter, and don't miss out.